Stone Veneer Installation – A Guide for Architects and Builders
by Cultured Stone
POSTED IN: Industry Trends
Manufactured stone veneer can be significantly easier and more cost effective to install than natural stone and can be used in a variety of applications and on many different surfaces. Here’s a quick guide to doing it right.
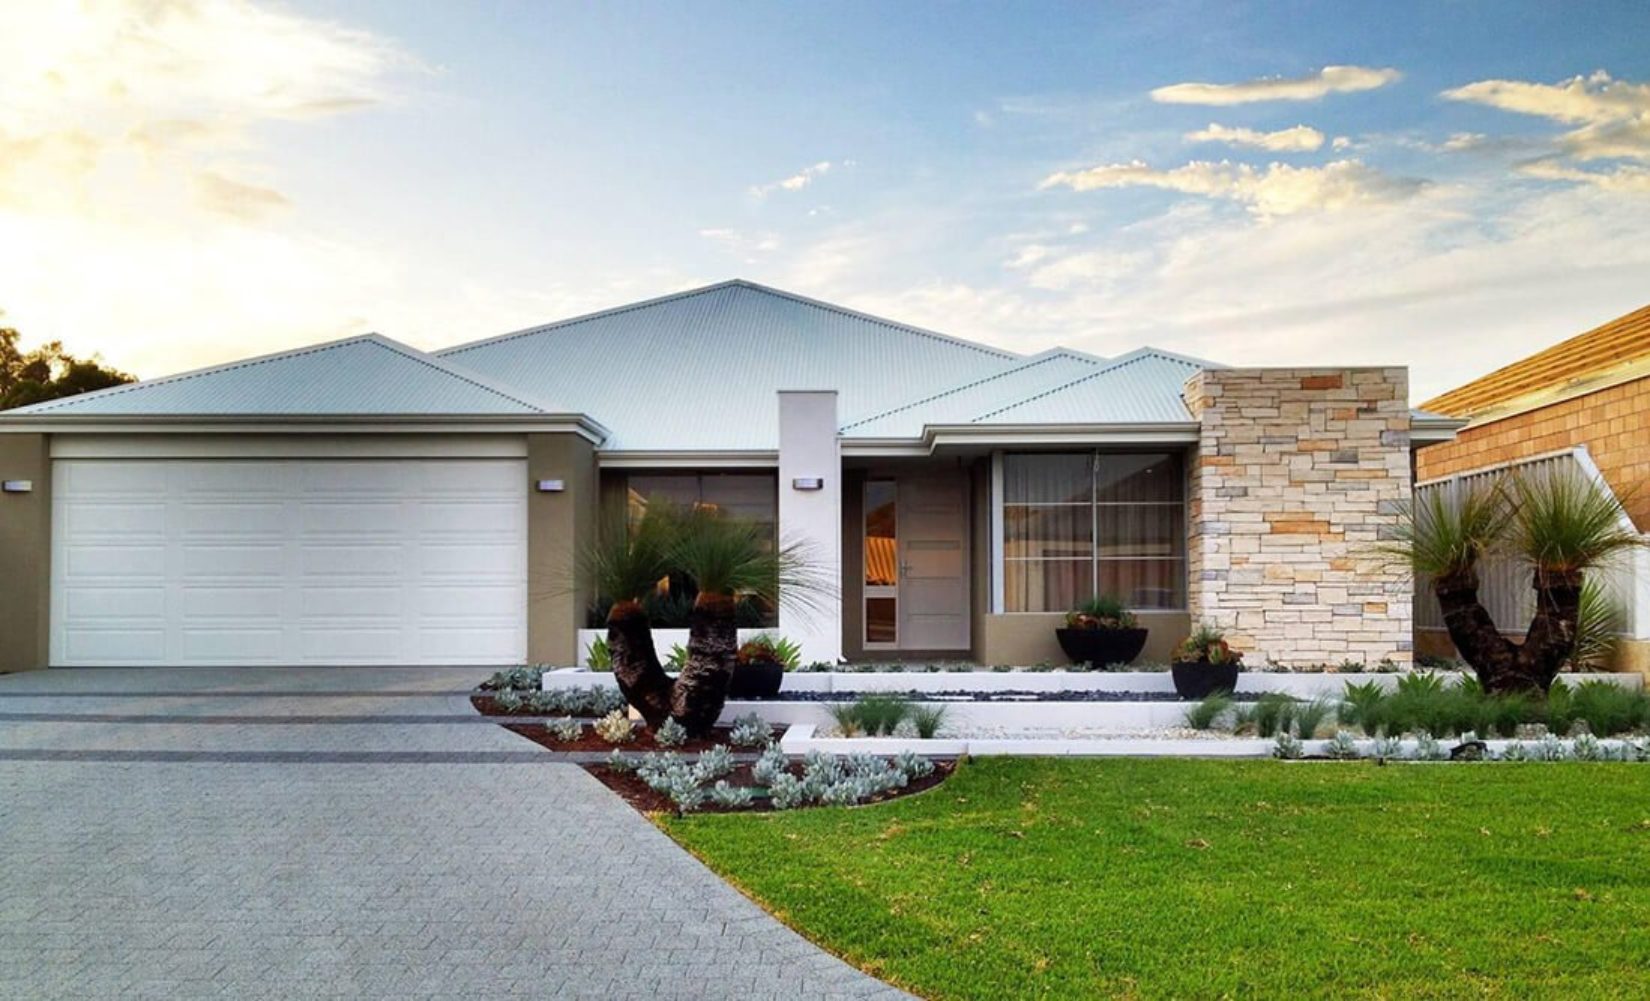
With its versatility and light weight, faux stone can be used in a wide array of architectural applications. Architects and builders can employ it in places ranging from foundation façades and chimneys to statement walls and outdoor landscaping applications.
Plus, there are options for installing stone veneer over both metal and wood-framed walls, as well as over masonry substrates of CMU block or brick, and also over poured concrete.
With so many application options, proper installation procedures make all the difference in ensuring manufactured stone surfaces withstand the tests of time and weather. In this article, we’ll share some tips and guidelines on stone veneer installation to help your projects go smoothly and remain on budget.
Related Reading: 3 Expert Architecture Tips: Design Smart Now To Avoid Costly Errors Later
Preparing Your Surface for Faux Stone Installation
Before beginning installation, the first step is ensuring that the surface to which you plan on applying the stone veneer is compliant with local building codes, and does not exhibit any signs of structural failure or deterioration. No matter the surface, you want to ensure proper gapping of sheathing materials (typically ⅛” at seams) to allow for expansion and avoid cracking the stone veneer.
When working with frame construction, you’ll typically see spacing of 16” on center with some kind of sheathing material. Make sure when working with frame construction that you apply two layers of Water Resistive Barrier (WRB) and install a weep screed to allow moisture to escape.
The primary layer of WRB is responsible for drainage of any incidental water that infiltrates the wall system, so investment in a good primary WRB is critical. Be sure to consider the following:
- Vapor permeability
- Tear resistance
- Water resistance
- Perforated or spun bond
- Ease of installation
- Durability on the job site
- Risk of fastener penetration
- Length of exposure to UV rays
The second layer of WRB, often referred to as the “sacrificial layer,” protects the primary WRB from mortar adhesion while also establishing a small drainage plain between the two layers. While you will want to consider the same properties as you do for the primary WRB, this second layer is less critical.
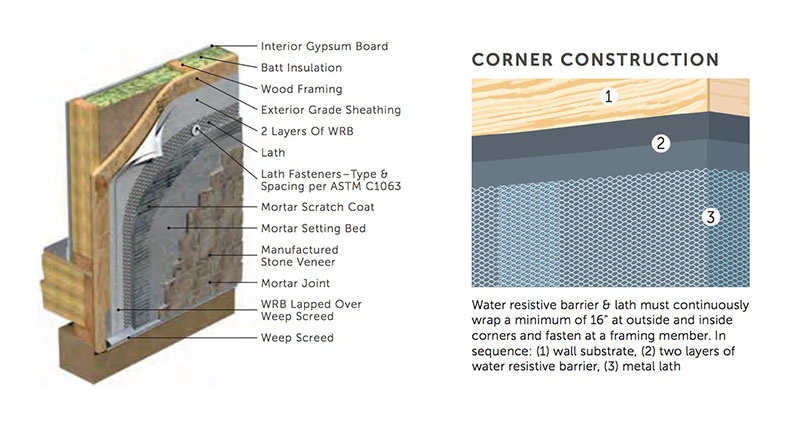
Before you begin installing your WRB, carefully consider the foundation weep screed. It’s critical to install a weep screed at the transition point between the foundation and the framing. If a few drops of water were to seep between the two layers of WRB, gravity will cause it to descend to the bottom of the adhered veneer system, where it needs a place to exit. A foundation weep screed provides this exit point while also protecting framing materials from moisture damage. The weep screed will also steer water away from the building.
In most instances, the weep screed provides a 4” clearance from grade or a 2” clearance from a paved surface. You should install the weep screed first, so that WRB materials can overlap its 3” attachment flange in shingle fashion.
If you’re dealing with masonry, as opposed to frame, construction building codes don’t require a WRB or weep screed. Nevertheless, most stone veneer manufacturers and building inspectors will still require the faux stone you install to meet the same clearance requirements. Plus, there is nothing that precludes installation of a WRB in masonry applications. However, if you install a WRB, you’ll lose the option to adhere the stone veneer directly to the masonry.
For a complete list of surfaces onto which you can adhere manufactured stone, plusspecific installation guidelines for each, refer to Cultured Stone’s Resources.
The 3 Principles of Water Management in Manufactured Stone Installation
Water management is a critical component of proper stone veneer installation. Achieving appropriate water management requires adherence to three principles:
- Barrier system: This stops water at the exterior face of the cladding.
- Concealed barrier system: This is a secondary material further in the wall that drains and manages water. Typically, a WRB forms the “concealed barrier.”
- Rainscreen: This uses the same concealed barrier (WRB) but also provides a larger physical air space between the WRB and the cladding. While not required in all climates, the rainscreen provides an additional layer of water infiltration protection.
Lath represents the skeleton of the adhered stone veneer system in much the same way framing is the skeleton of stick-built construction. For greater details on using lath in faux stone installation, refer to “Expanded Metal Lath Installation for the Application of Portland Cement Stucco: The Eight Deadly Sins.”
Lath installation is critical. To ensure proper installation, fasten lath to framing so the weight load of the adhered manufactured stone veneer system can be transferred to the framing. That means using appropriate length fasteners (make sure they are galvanized and corrosion-resistant) to obtain a minimum ¾” penetration into the framing. You want to space fasteners 6” on center, and lap lath 1’ at vertical and horizontal seams. At both inside and outside corners, wrap lath past the corners to the next framing member approximately 16” down the wall.
Among the options for lath are expanded metal lath, woven wire lath, welded wire lath, fiberglass lath, and some types of plastic lath. As you determine what type of lath to use, remember that faux stone, mortar, and lath can weigh up to 25 pounds/sq. ft. Lath with its attachments will carry this load to the framing. Don’t cut corners.
Scratch Coat for Corrosion and Weather Resistance
The scratch coat provides two critical functions: minimizing water and air infiltration (and decreasing corrosion susceptibility) and providing total weather resistance for the wall. The mass of the total scratch coat along with setting bed mortar and the faux stone units provides water management through both absorption and evaporation.
For optimal performance, the scratch coat should be ½ to ¾” thick. Using a self-furred or lath furring fastener, center the lath near the middle of the mortar thickness. Reinforcement at the center of the mortar offers optimal crack resistance. Failure to fur the lath will make it difficult to obtain the necessary scratch coat thickness, and will also prevent reinforcement from functioning to its full extent.
Achieving a Solid Bond for Your Manufactured Stone Veneer
To meet building code requirements, adhered stone veneer must achieve a minimum bond strength of 50 psi. To meet these standards, follow these key principles:
- Make sure the faux stone units are clean. Remove any loose material from the back with a wire brush.
- Consider weather conditions. Hot and/or dry weather will require you to dampen the back of each manufactured stone unit as well as the scratch coat. Meanwhile cold weather will require you to heat stone veneer materials, and also to tent and heat during installation and curing.
- Choose high-quality mortar that meets (or exceeds) stone manufacturer requirements.
- Carefully mix mortar so that the setting bed mortar is wet enough that a trowel covered with it can be inverted and the mortar will remain adhered. Mix only what you can use, as the bond is critical. Don’t take chances here.
Consider the best options for application:
- Trowel mortar onto the wall in a 5 sq. ft. area ½ to ¾” thick, and press the faux stone unit into the mortar with a slight rotation back and forth.
- Apply a thin layer of mortar to the back of the stone, and then press it entirely into the texture, somewhat in the manner of lightly buttering bread. Apply a second back-buttered layer, again covering the entirety of the stone to a ½ to ¾” thickness, and press onto the prepared scratch coat.
- Use a combination of both methods.
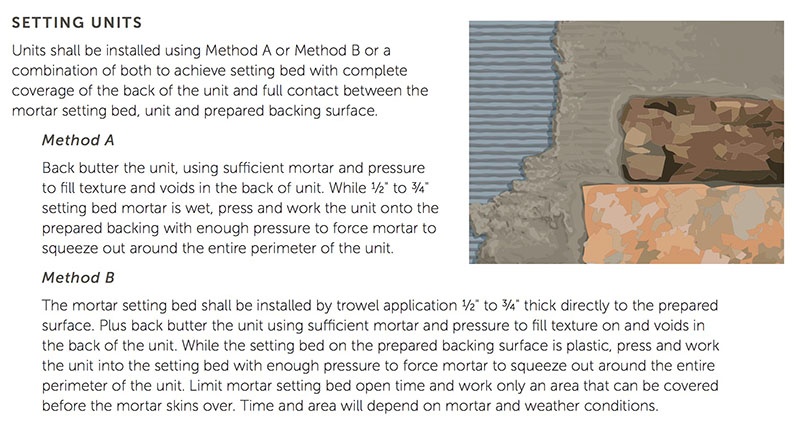
The goal is to achieve a uniform layer of mortar on the wall that supplements the mortar of the scratch coat and achieves a minimum 50 psi shear bond strength. You should have no voids within the mortar layers that could capture water, as captured water can freeze and result in debonding.
Related Reading: Green Building Materials: 5 Sustainable Resources for Your Next Project
Maintaining Faux Stone for the Long Haul
Every faux stone veneer manufacturer has specific care and maintenance requirements to help you and your client preserve the beauty and function of your manufactured stone veneer for decades to come. Be sure you and/or your client understand and adhere to instructions for sealing, cleaning, de-icing, and power washing stone veneer surfaces to maintain warranty coverage and long-term performance.
Cultured Stone products are covered by a 50-Year Limited Warranty when installed according to manufacturer’s instructions. For more detailed instructions, download one of our stone veneer installation guides.